Add Collar
This section provides details on collaring in the Coverages section of adding or editing an allocation. In a renewed allocation, a collar is a percentage or dollar range restricting the difference between the new charge and the prior year's charge.
Collaring prevents extreme fluctuations in cost between one year and the next when charging accounts.
You can only add a collar if you are 1) renewing an allocation and 2) using the collar on Full Distribution coverages.
- Access the Coverages tab in the Allocations module.
- Under the action menu for a coverage, select Collar.
- Fill out the form:
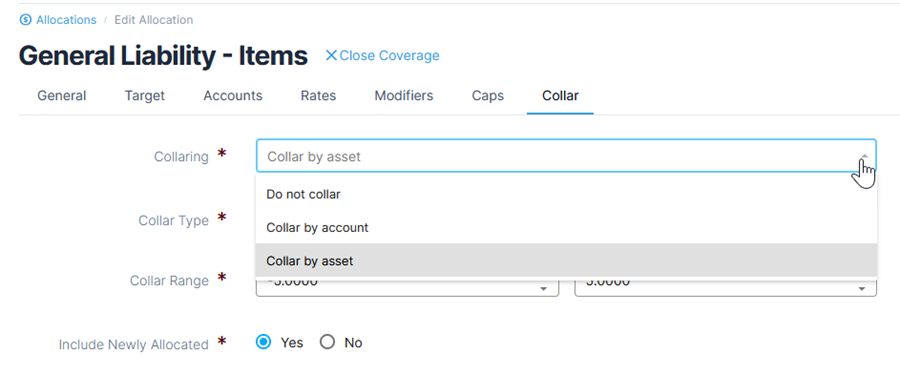
- For Collaring, select either Do Not Collar, Collar by account or Collar by asset. If you select Collar by asset, the collar will only apply to assets present in both the current year and previous year (renewed allocation). If you select Collar by account, the collar will apply to the total charge for the account and coverage, regardless of asset changes.
- For Collar Type, select either Percent of Amount or Dollar Amount.
- For the Collar Range, type in the low and high amounts in the fields. In this example, the collars are -5% and 5%. These values mean that 1) if the new charge is more than a 5% increase compared with the previous period, the actual charge will only be 5% more, and 2) if the new charge is more than a 5% decrease compared with the previous period the actual charge will only be 5% less.
- For Include Newly Allocated select Yes or No. If you select Yes, new assets or accounts that were not part of the renewed allocation will be included in full distribution collaring logic. These assets or accounts may incur relatively higher charges since they have no prior charge to collar against. If you select No, newly allocated assets or accounts will be excluded and will not incur higher charges.
- Once you have finished adding in collars, click Done to proceed to the next section.

The 5% maximum increase charge in this example is a high collar and the 5% maximum decrease charge is a low collar. If either of these collars is applied to a charge, you will see an icon next to the charge on the Preview page. Read more about the charge icons and their meanings.
| High collar applied: |  |
| Low collar applied: |  |
Do not add or drop an asset value after the allocation has begun. To make changes, click Edit for the asset under the action menu in the relevant asset module.