Schedule Reports

You can schedule reports on assets, transactions, or account information to be sent to yourself or to anyone in your organization. The delivery methods include both email and fax. The directions below will show you both options for creating a scheduled report, starting with the fastest method.
Schedule a Report - Option 1 (fastest)
Complete Add Scheduled Report Form
Schedule a Report - Option 1
-
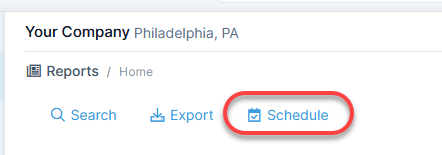
Open the Reports module of the account that you plan to edit.
- Locate the report in the list. Under the action menu, click Schedule.

- See the Complete Add Scheduled Report Form section below.
Schedule a Report - Option 2
-
Open the Reports module of the account that you plan to edit.
- Click Schedule to open the Scheduled Reports page.
- Click Add Schedule Report to open Add Scheduled Report page.

- See the Complete Add Scheduled Report Form section below.
Complete Add Scheduled Report Form
- Select an Account if necessary.
- Type a Schedule Name.
- Select a Delivery Method.
- If you select Email, type in an Email Recipient.
- If you select Fax, include a Fax Recipient Name and a Fax Number.
- Select Yes or No for Send Blank Report. If you select Yes, you will receive a report even if it does not contain data.
- Select the Privacy of this report. The options include:
- Shared - Allows others who access the account to view and edit the scheduled report on the Scheduled Reports page.
- Read-only - Allows others who access the account to view but not edit the scheduled report on the Scheduled Reports page.
- Private - Allows only you to view and edit the scheduled report on the Scheduled Reports page.
- Proceed to the Schedule tab.
- Select a date and time (or leave as today's date and current time) from Starting On.
- Select a Schedule Type. The following list describes the options available:
- One-time - Select this option to receive the report only one time. You can also consider View Reports to see the report immediately.
- Recurring - Select this option to receive the report regularly on a scheduled basis.
- Select the Months that you want to receive the report.
- Select the Days of the Month that you want to receive the report. Or select Weekdays if needed.
- Select an Ending On date.
- Proceed to the Report tab.
- Select a Report under Report & Parameters.
- Enter the Parameters if the report includes parameters. See example.
- Click Add Scheduled Report.
You can send your scheduled report to multiple addresses within your organization. Separate the addresses or numbers with a semicolon (;).
Option: You can base your schedule on the weekdays rather than Months and Days by selecting Weekdays, and then select which weekday (e.g. First Monday of every month).
The Ending On date is the date in which you will stop receiving this report. The Ending On date cannot have the same Starting On date.
For more information on scheduled reports, see the following topics: