Table of Contents
Manage Documents - Items
Please see general help topics on document management:
- View thumbnail images of documents within the module grid.
- Preview files using the document viewer.
- Edit Microsoft Word and Excel documents directly within Quadra.
- View list of supported file types.
Access Documents
-
Open the Items module of the account you plan to edit.
- Find the item within the list. Under the action menu, click Documents.

Add a Document
- From the Documents page, click Add Document. Alternatively, use the Quick Add feature or the drag-and-drop method to add documents. With these methods, the category and description will not be included. These can be edited once the document is added.

- Verify the Account, Owner, Module, and Category. Change information as needed.
- Click Browse to select a file from your computer.
- Type a Description of the file.
- Click Add Document.
- Return to the home page using the breadcrumb at the top.
View Uploaded Documents
- Open the Documents page within the module.
- Click on the document name or thumbnail image to open a larger view of the file using the document viewer.
Alternatively, click the document's icon for a quick preview.
Edit Document Details
- Open the Documents page within the module.
- Find the document that you wish to edit in the list. Under the action menu, click Edit.
- Edit the fields as needed.
- Click Edit Document.
- Return to the home page using the breadcrumb at the top.

Remove a Document
- Open the Documents page within the module.
- Find the document in the list. Under the action menu, click Remove.
- Type a Remove Comment to describe the reason for removal.
- Click Remove Document.
- Return to the home page using the breadcrumb at the top.

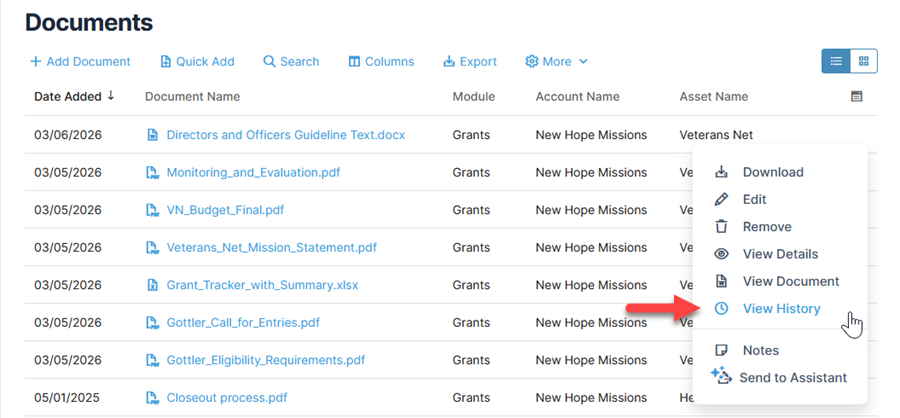
View Document History
Document history, including when the file was uploaded or edited, can be viewed using the Documents module.