Roles

Users can be assigned Roles that allow them to perform specific activities based on their level and job function. When creating a new role, you will be able set parameters on which modules can be accessed as well as which tasks can be accomplished, such as adding new accounts, removing assets, or editing information. For example, an employee in the accounting department can be assigned a role that provides access to the Accounts Receivable module only. Within this module, more specific activities can been selected based on the employee's responsibilities.
Access Roles
-
From Quadra, access Administration.
- On the left hand menu, go to Users and click Roles.

Add a Role
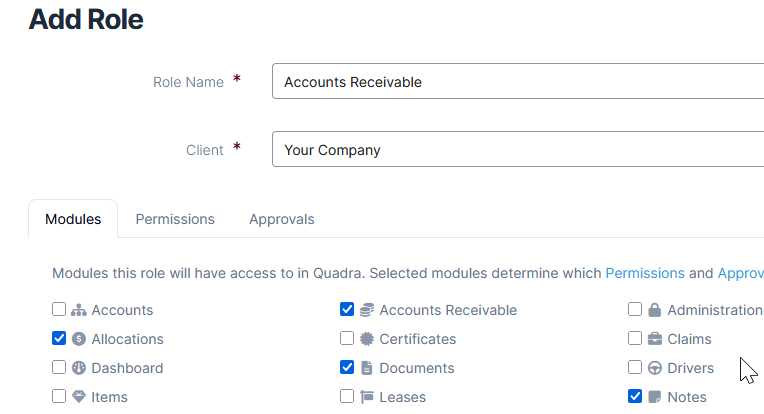
- Open Roles from Administration.
- On the main Roles page, click Add Role.

- Fill out the Modules section of the Add Role form:
- Type in a Role Name.
- Confirm the Client.
- Under the Modules tab, select which modules you want the user to have access to using the check boxes.
- Click Permissions to move to the next section.
- Using the arrows, open each module section. For the Administration module, note that you can grant permission to certain modules only and that users will be able to view, edit, and remove module data shared by all accounts for those modules.

- Click the check boxes to select which actions the user will be able to perform. Click 'Select All' to give the user permission to perform all actions in the module.

- Click Approvals to move to the next section.
- Some modules include actions that require approval. These modules will be listed here. Use the arrows to open each module section.
- Click the check boxes for any actions that the user will require approval to complete.
- At the bottom, click Add Role.
The sections titled Contacts and Core will appear in the Permissions section regardless of which modules are selected. Here you can select general permissions for activities found across modules.
Edit a Role
- Open Roles from Administration.
- Select a Role from the list and click Edit under the action menu.

- Edit the Role as needed:
- Edit the Role Name.
- Confirm the Client.
- Under the Modules tab, edit the modules using the check boxes.
- Click Permissions to move to the next section.

- Using the arrows, open each module section. Edit the actions as needed using the check boxes.
- Click Approvals to move to the next section.
- Actions that require a manager's approval will be listed in this section. Use the arrows to open each module section, and edit the actions as needed by clicking the check boxes.
- At the bottom, click Save Role.
Copy a Role
If you need to create a new role that is similar to an existing role, use the Copy function and then make the necessary edits.
- Open Roles from Administration.
- Select a Role from the list and click Copy under the action menu.

- Make changes as needed on the Edit Role form:
- Create a name for the new role under Role Name.
- Confirm the Client.
- Proceed with making edits on the Modules, Permissions, and Approval tabs. See instructions above for editing a role.
Delete a Role
- Open Roles from Administration.
- Select a Role from the list and click Remove under the action menu.

- In the confirmation box asking if you are sure you want to remove this role, click OK.
View Users Assigned to a Role
- Open Roles from Administration.
- In the grid, select an option under Users. The link displays the number of users assigned to that role.
The list of users will appear. If you select the Edit option, you will be directed to the user information in the Users section where you can make changes.
